
- Posts: 188
- Thank you received: 0
Forbindelse og SSH kryptering til ekstern linux enhed (Raspberry)
- JudgeFredd
- Topic Author
- Offline
- Administrator
-

Less
More
2 years 3 months ago #168
by JudgeFredd
Ikke helt sikker, men tror det er noget der bruges, så man kan styre f.eks. en Raspberry "KIOSK" skærm, fra Home Assistant panelet, e.g. genstarte den, åbne andet browser vindue m.v.
Ikke noget jeg selv bruger p.t. men havde det oppe at køre for nogle år siden..
Tilføj addons ssh terminal og portainor, åbn portainer, find din homeassistant "instance", åbn terminal.
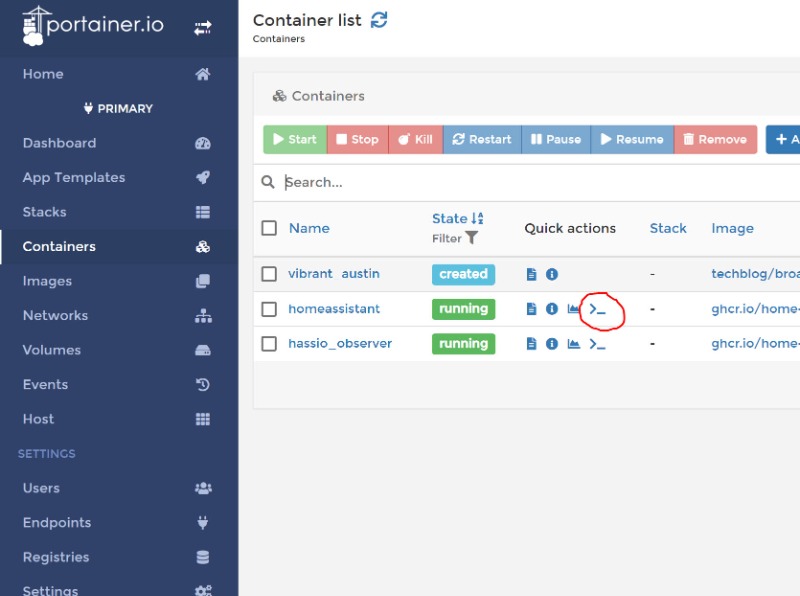
Log ind med brugeren root, kør kommandoen ssh-keygen, spring over passphrase, gem filen i /config/ vælg selv passende navn, i dette filfælde bruger vi navnet "keypass"
Der bliver gemt to filer, keypass samt keypass.pub.
Åbn filen keypass.pub, med f.eks. notepad, kopier hele teksten.
Følg herefter nedenstående vejledning i forhold til at indsætte nøglen i din raspberry.
pimylifeup.com/raspberry-pi-ssh-keys/
Uddrag:
1. Back on the Raspberry Pi, we need to utilize a few commands to setup our authorized_keys file. This is the file that the SSH daemon will check when a private key is used for authentication.
To begin let’s create the folder that our authorized_keys file will be sitting in. To do this, we will be using the install command with a few parameters to set the correct permissions.
Run the following command on your Raspberry Pi.
install -d -m 700 ~/.ssh
2. With the folder created let’s go ahead and put our public key in the authorized_keys file.
To do this run the following command to begin editing it.
nano ~/.ssh/authorized_keys
3. In this file copy and paste the contents of the public SSH key that you generated earlier using either your Windows device or your Linux device.
SSH will authenticate any private keys against the public key present to see if it is a legitimate connection to authorize.
4. Once you have your public SSH key entered into the authorized_keys file, you can save and quit out of the file by pressing Ctrl + X then Y and finally Enter.
5. With the file now saved we need to make sure it has the correct permissions. To do this, we need to run the following commands.
These commands will assign the correct permissions to the file so that it can be read by SSH when you try to log in.
If you are not using the default “pi” user on Raspbian make sure you replace the text “pi” in the following command with the name of the user you want to use this for authentication.
sudo chmod 644 ~/.ssh/authorized_keys
sudo chown pi:pi ~/.ssh/authorized_keys
Ikke noget jeg selv bruger p.t. men havde det oppe at køre for nogle år siden..
Tilføj addons ssh terminal og portainor, åbn portainer, find din homeassistant "instance", åbn terminal.
Log ind med brugeren root, kør kommandoen ssh-keygen, spring over passphrase, gem filen i /config/ vælg selv passende navn, i dette filfælde bruger vi navnet "keypass"
Der bliver gemt to filer, keypass samt keypass.pub.
Åbn filen keypass.pub, med f.eks. notepad, kopier hele teksten.
Følg herefter nedenstående vejledning i forhold til at indsætte nøglen i din raspberry.
pimylifeup.com/raspberry-pi-ssh-keys/
Uddrag:
1. Back on the Raspberry Pi, we need to utilize a few commands to setup our authorized_keys file. This is the file that the SSH daemon will check when a private key is used for authentication.
To begin let’s create the folder that our authorized_keys file will be sitting in. To do this, we will be using the install command with a few parameters to set the correct permissions.
Run the following command on your Raspberry Pi.
install -d -m 700 ~/.ssh
2. With the folder created let’s go ahead and put our public key in the authorized_keys file.
To do this run the following command to begin editing it.
nano ~/.ssh/authorized_keys
3. In this file copy and paste the contents of the public SSH key that you generated earlier using either your Windows device or your Linux device.
SSH will authenticate any private keys against the public key present to see if it is a legitimate connection to authorize.
4. Once you have your public SSH key entered into the authorized_keys file, you can save and quit out of the file by pressing Ctrl + X then Y and finally Enter.
5. With the file now saved we need to make sure it has the correct permissions. To do this, we need to run the following commands.
These commands will assign the correct permissions to the file so that it can be read by SSH when you try to log in.
If you are not using the default “pi” user on Raspbian make sure you replace the text “pi” in the following command with the name of the user you want to use this for authentication.
sudo chmod 644 ~/.ssh/authorized_keys
sudo chown pi:pi ~/.ssh/authorized_keys
Please Log in or Create an account to join the conversation.
Time to create page: 0.400 seconds